
If you'd like to have a brand-new weight bench, but you don't want to spend a lot of money, then you might consider making one yourself. I decided to make a multi-position flat/incline bench using a 4x4 post as a base. This bench doubles as a patio seat so i don't have to hide/put it away after each workout.
Bear in mind that the dimensions of this bench will not be suitable for everybody; it will depend on the height of the person using the weight bench. The bench is about 3.75 feet long which is an average size.
The Bench plan can be viewed/downloaded here>>> Weight Bench Plan/Drawing To download a copy, right click then "Save Target As" then hit "Save".
WARNING: This bench is not intended for serious heavy lifting, use it at your own risk.
Monday, August 31, 2009
Sunday, August 30, 2009
DIY Portable Garment Steamer Stand
A simple DIY project on how to make your own stand for a portable garment steamer. Some portable garment steamer does not come with it's own stand, rather it has a door hook (for portability), which is used to hold your garment and the steamer noozzle while steaming.
Things you need:
1= galvanized pipe (with thread on both ends) 1/2 inch diameter x 5 feet long
1= galvanized pipe (with thread on both ends) 1/2 inch diameter x 1 foot long
1= 1/2 inch pipe end cap
1= 1/2 inch pipe flange
1= 1/2 inch pipe 90º elbow
1=3/4 x 20 x 11 inch solid wood or plywood
1= 3/4 x 3/4 x 60 inches long wood (base trim)
4= wood screws
Nails
16 inches long steel wire (holder for the steamer nozzle)
some heat shrink tubing
Wood Glue
Paint, wood stain, and Polyurethane protective finish (optional)
4= caster wheels (optional)
Saturday, June 20, 2009
Handlebar mount water bottle cage
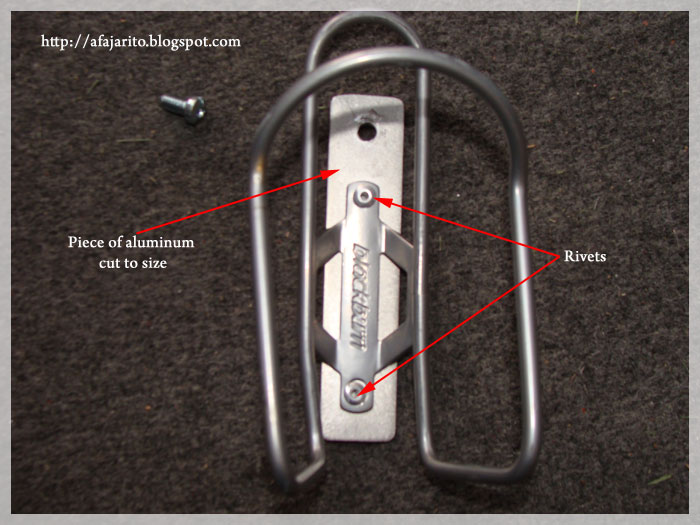
My son's bike has no water bottle braze-on on the frame. I thought the best place to mount it would be on the handlebar for easy reach. You can buy a handlebar mounted water cage bottle for cheap, but I decided to built my own. I have an extra water cage bottle and a ground clamp lying around, so the built begins.
Things you need:
Water bottle cage
Grounding pipe clamp (available at your local hardware store)
Paint (optional)
Philips head screwdriver
Piece of aluminum/or steel strip, about 4.5 inches long and 1 inch wide
Drill with drill bit
Screws or rivets (and a rivet fastener)
Lock washer (optional)
1. Picture below (click to enlarge) demonstrates how to attach the water bottle cage to the piece of aluminum strip.
Sunday, June 14, 2009
Installing a ceiling mount Bike Lift.
I dicided to install a ceiling mount bike lift for storing our bikes and free up some precious garage space. I found a good priced bike lift from Costco online, it's made by Racor ($14.99 +shipping and tax). It has fairly good review online, so I gave it a try. The product works really well, construction is fairly good. Rope quality is somewhat okay, not the best but easily replaceable. Fasteners that came with the unit is also of good quality, although some reviewers have reported some quality issues.

Tools needed:
Philips head screwdriver
Drill with drill bit
Tape Measure
Stud locator for ceiling with drywall
For installing multiple bike lift: 2 x 8 and 2 x 6 wood, length depending on number of lifts (see below)
Bike lift box and install instructions. See pics below (Click pic to enlarge)
Amazon Search Links:
Ceiling Mount Bike Lift: Click here.
Amazon Search Links:
Ceiling Mount Bike Lift: Click here.
Friday, June 12, 2009
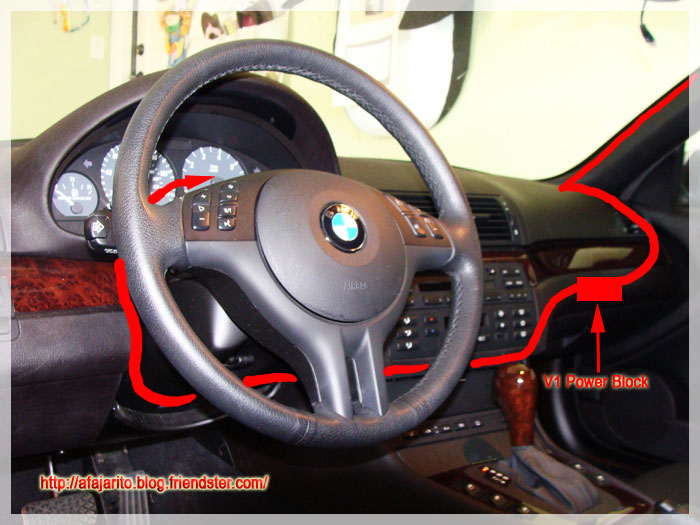
Hardwiring V1 and V1 Concealed Display to a BMW 3 convertible.
- Things you need:
V1
V1 Hardwire Kit
V1 Concealed Display
BMW 3cic (E46)
Fuse Tap (Full size, not the mini)
2 Amp Fuse (Blade type)
Philips Screwdriver
Electrical Tape or Heat Shrink Wrap
Crimper
Wire Cutter 0r Utility Knife
Link to V1: https://store.valentine1.com/store/
1. Plan where your V1 will be mounted (left or right side of the rear view mirror), I mounted mine on the right side. Below is the wire routing diagram.
Subscribe to:
Posts (Atom)