
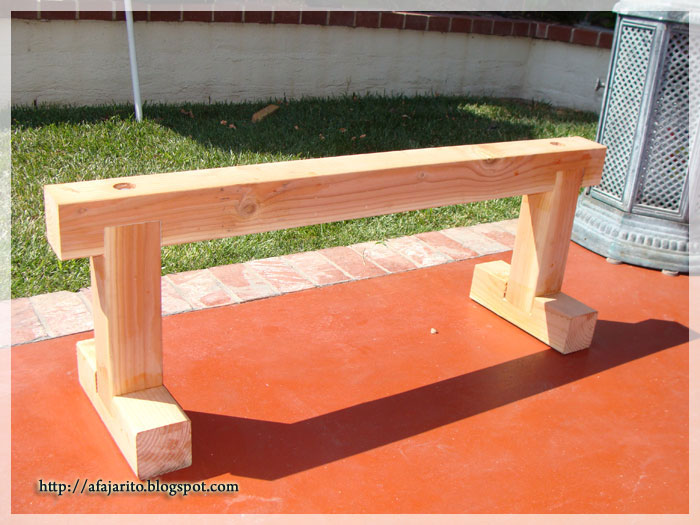
Bear in mind that the dimensions of this bench will not be suitable for everybody; it will depend on the height of the person using the weight bench. The bench is about 3.75 feet long which is an average size.
The Bench plan can be viewed/downloaded here>>> Weight Bench Plan/Drawing To download a copy, right click then "Save Target As" then hit "Save".
WARNING: This bench is not intended for serious heavy lifting, use it at your own risk.
Materials you need:
4 ft. of 3/4 x 12 piece of plywood or solid wood
3 ft. of 1 x 2 wood
8 ft. of 2 x 2 wood
8 ft. of 4 x 4 wood post
1 (#10) 8" bolt and nut
2 (#8) 3" bolt and nuts
1 (#10) 12" bolt/screw and 4 bolt nuts
8 (#10) nylon washers
14 (#10) flat washers
4-3 inch long lag screws
4 rubber or rubberized feet
Some nails and wood glue
Wood stain and Polyurethane protective sealant (Optional)
Tools you need:
Circular saw
Miter saw (optional)
Power drill with drill bits, Forstner bit and the like (used to counter sink lag screws)
Wood chisel
Socket wrench/ pliers
Hammer
Sander or Sand paper
You can click on any image to enlarge.
1. Cut all wood pieces to the proper lengths.
2. If you've noticed from the above bench plan/drawing, a simple dado joint was used to join the bench wooden base and legs. Use your circular saw and make multiple passes to remove the unneeded portion, finish it up using a wood chisel (shown on the second image).
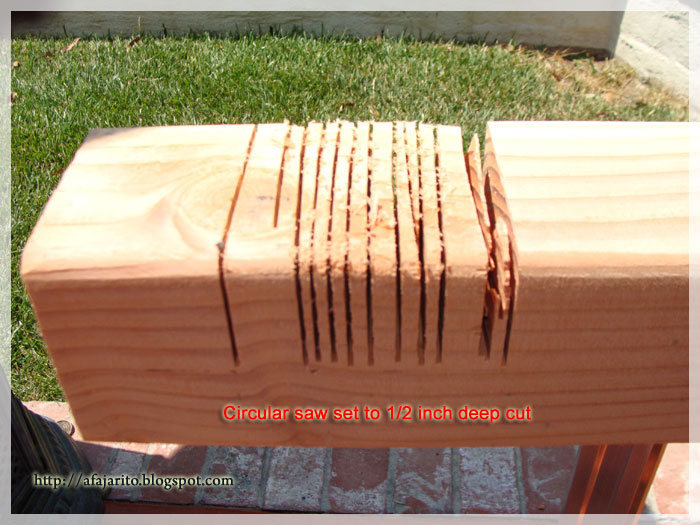
*** CORRECTION*** Cut for dado joint should be 1 1/2 inch deep, not 1/2 inch (Thanks for the reader that pointed that out).

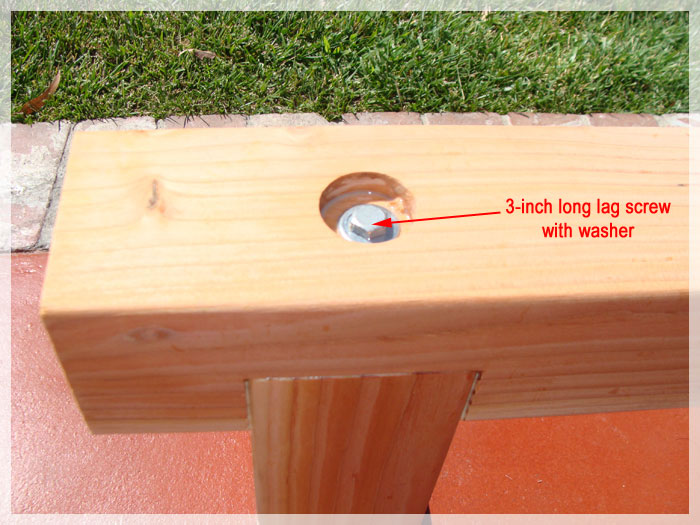
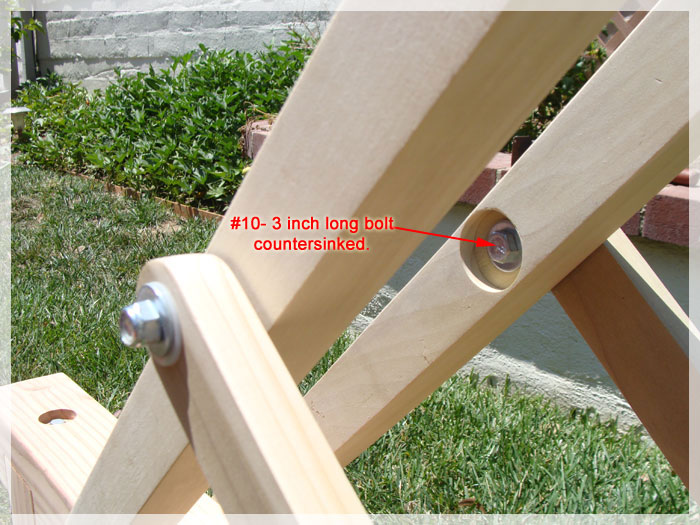
3. Use a generous amount of wood glue to all joints; then secure it with a lag screw.Countersink the head of lag screw to make it flush. See image below.
4. Next, drill a hole through on one end of the (2) 2 x 2 wood (hole should be big enough to accommodate the #10 bolt), this will be used for the adjustable backrest support. Then, drill a hole straight through the side of the bench top support (pls. refer to the bench plan/illustration).
5. Use (#10) 8" bolt and nut to fasten the adjustable backrest support to the bench top. Place a nylon washer in between the metal flat washers to minimize friction during operation.
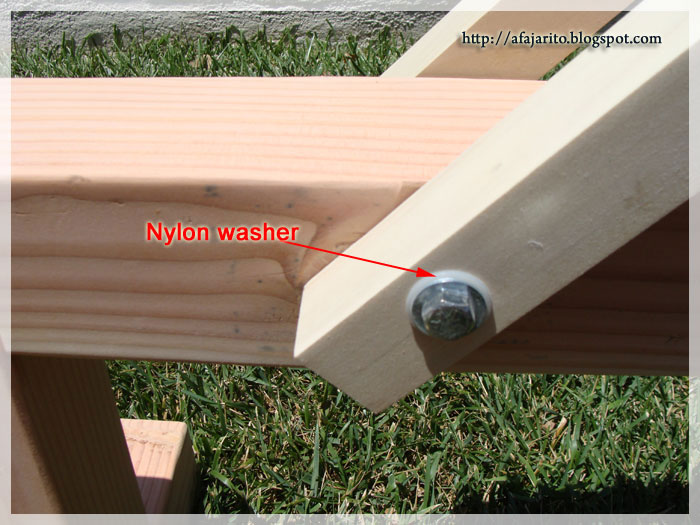
6. Do the same thing with the swing arm.
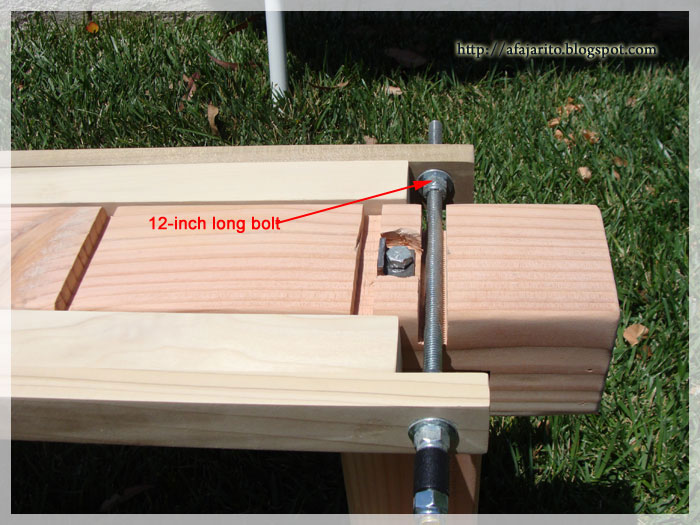
7. The (#10) 12" bolt is secured at the end of the swing arm using 4 bolt nuts.
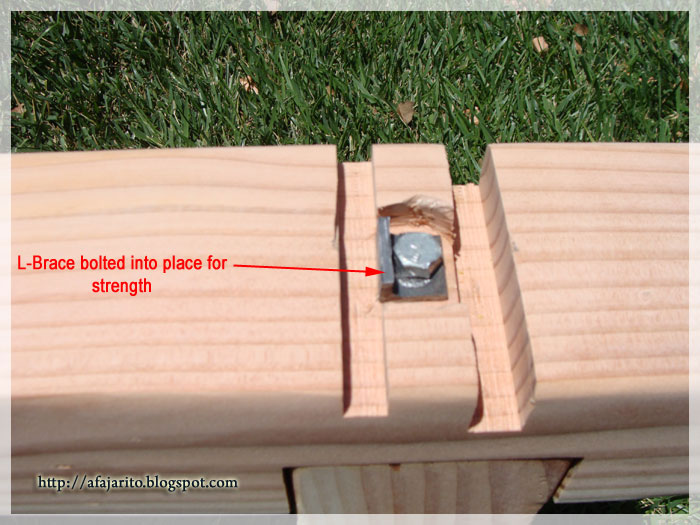
8. Again, refer to the bench plan/illustration where to cut the notches on the bench top support; this is where the swing arm support will rest during use. If you prefer, you can eliminate some notches thus limiting the angle it can be adjusted.
9. Due to proximity of the second notch to the first notch, i use a small metal L-bracket to give it more strength.
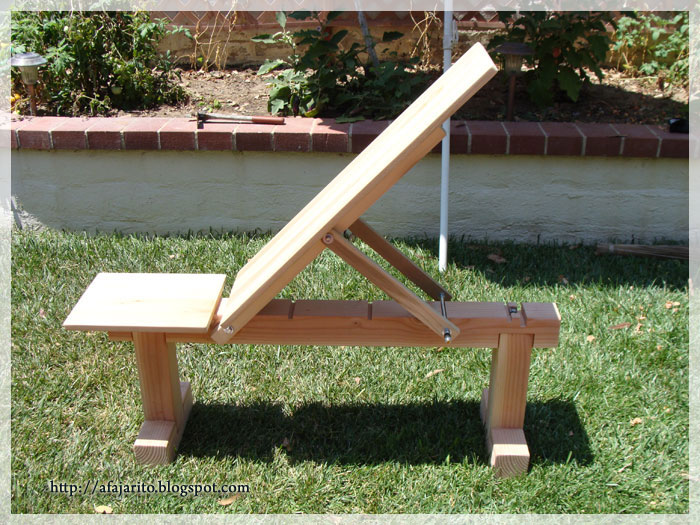
This is how it should look like after the adjustable backrest support and swing arm are bolted in place. Note that everything should be flush with the bench top support when in neutral/flat position.

10. Next, fasten the bench seat and backrest using nails and wood glue. Give it a good sanding to remove rough edges.
Rear view, bench at 45º incline position.

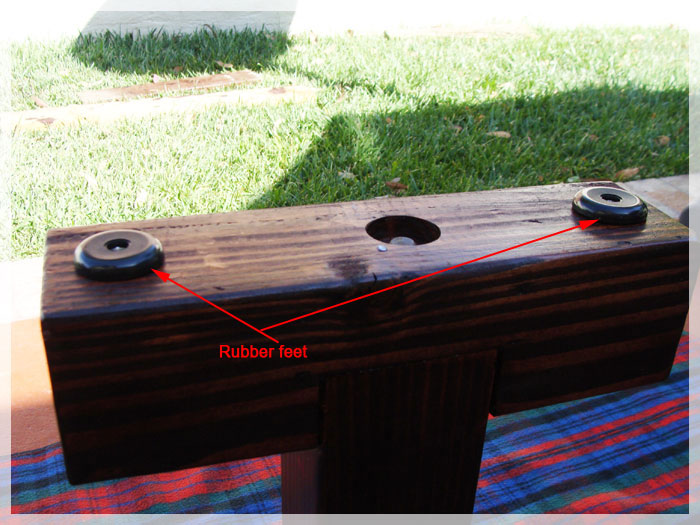
11. Use rubber or rubberized feet to prevent the bench from sliding during use.
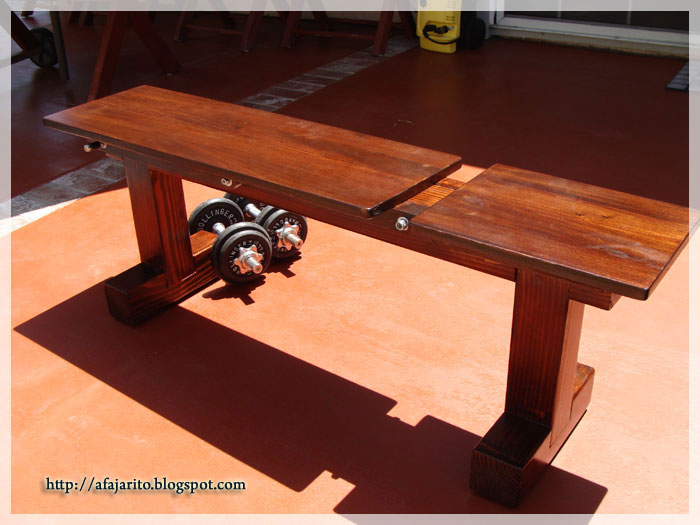
After some finishing touches (wood stain and 2 coats of polyurethane finish) this is how it looks like.
Flat/ Neutral position.

22º Incline
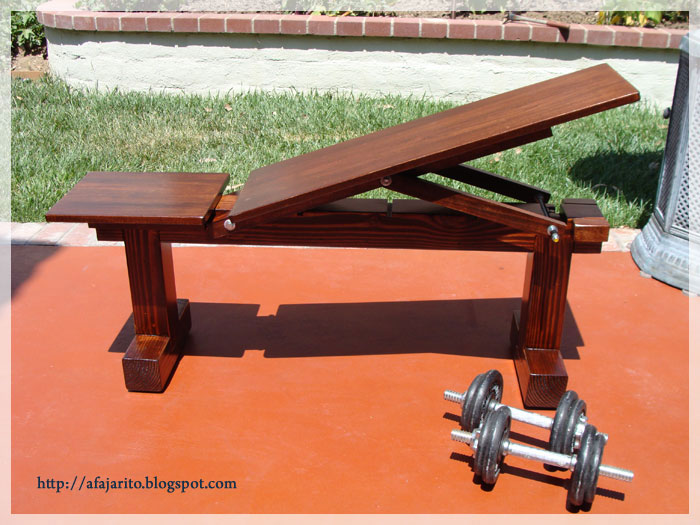
45º Incline.

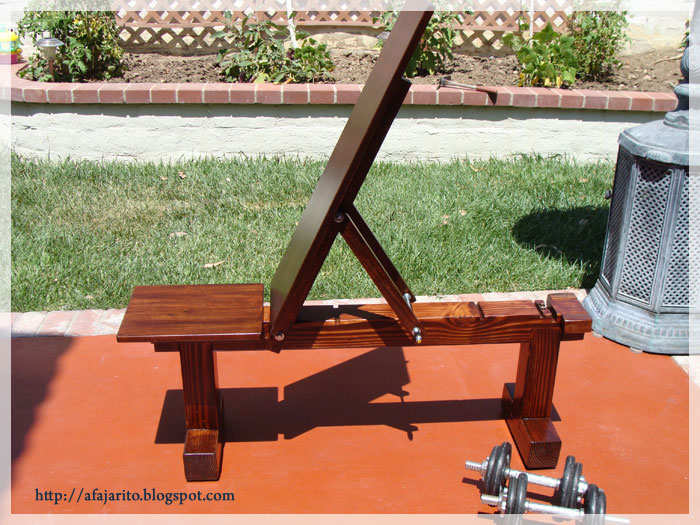
68º Incline.
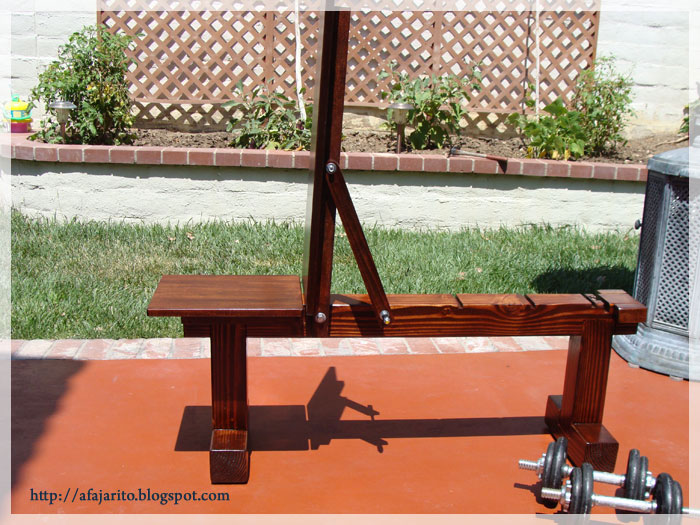
90º Incline.
That's it.
you helped me a lot :)
ReplyDeleteYou are most welcome. Thank you.
ReplyDeleteIt's brilliant! thanks!
ReplyDeleteDo you happen to know how much weight this bench supports in the incline position?
ReplyDeleteI don't lift super heavy weights, so I cannot exactly say how much weight it can support in the incline position. I usually just use dumbbells for my training. The heaviest weight I did was 100 lbs. and it felt really solid (also bear in mind the type/quality of material you will use for this built will have an impact on its durability).
ReplyDeleteIf you are trying to lift really heavy weights you might be better off getting a commercial one for safety reasons, they're usually made of metal/steel.
A beautiful thing to be sure. Just what I have been searching for. Thank you!
ReplyDeletevery nice job! just what I have been in the market for. thanks for the illustrations and dimensions too. couple of questions. your first cut, the dado, says 1/2" deep. shouldn't that be 1 1/2" deep? also the #10 bolts. can you tell me based on inches what size that is? thanks again. john
ReplyDeleteThanks for pointing that out, yes you are correct, it should be 1 1/2 inch deep not 1/2 inch (post corrected).
ReplyDeleteFor the bolts (#10) means it's a 10mm size bolts (metric), they come in different lengths. You need (1)=8 inches long, and (1)=12 inches long.
Where did you find 10mm 12inch and 8inch bolts from? They dot seem to exist from the sources I have looked into.
DeleteOne last thing. What type wood did you use? Looks very nice! thanks again, john
ReplyDeleteFor the legs and base, I use a standard 4x4 post from Homedepot. The back and adjustable swing arm support are made from hardwood for strength (can't remember the type of wood though).
ReplyDeleteThis is exactly what I have been looking for. Thanks.
ReplyDeleteMan, that is beautiful! My husband has been thinking about making a bench, rather than buying one. He's gonna love this one. Thanks for posting it for free, rather than making somebody buy your plans. You're a good guy!
ReplyDeleteYou're welcome.
ReplyDeleteI used the legs from an Oak TV Tray.Most of the time they can be found at a local Thrift Store..they work great,and they`re cheap.The Table itself can be cut down and used in place of the "Plywood".
ReplyDeleteHi Afajarito,
ReplyDeletegreat post, very informative and gives me a lot of good ideas.
Do you happen to remember the total cost of materials for this build?
Thanks
Spray a coat of metal primer on the benches. It is better to apply a coat of primer for better protection, particularly, if the metal is corroded excessively.Stainless Steel Benches
ReplyDeleteWithout a doubt it's a beautiful bench here in trinidad weight benches are expensive I will definitely be using you're design. thanks
ReplyDeleteSeriously classy looking bench. How comfortable is it on the back without pads or anything?
ReplyDeleteA regular standard of weight bench that can can help you to build your more muscle in your bodybuilding workout routines if you know how to use one correctly. Set an olympic weight bench in flat, incline, and decline positions for more options on executing compound exercises.
ReplyDeleteThis is amazing!
ReplyDeleteAny idea for homemade decline wooden bench? to do decline bench press and ab crunches? thx
ReplyDeleteNeat and creative design... will try to get one for me. Raju
ReplyDeleteThanks for the plans! I cut dovetail joints instead of the dado. Didn't take much longer and will help with torsion and tension stress (and it just looks nicer). I will likely pad the seat and rest with naugahyde and foam.
ReplyDeleteDude i have exactly the same dumbbells! thats gotta mean something!
ReplyDeleteAre the dimensions to the incline notches to the center of the notch or the edge?
ReplyDeleteCan you give detailed measurement of this plan. Thanks
ReplyDeletesorry I dont read your first note, the measurement is in the picture. thanks so much for sharing this
DeleteHow much are all of these going to cost?
ReplyDeleteNice work! I've been working on a similar concept before I found this and seeing your design has helped me along tremendously!
ReplyDeleteNice post. So informative. I would like to share something that you can find the best quality wooden bench online at best price from Housefull International Ltd in India. Thanks for sharing this post with us.
ReplyDeleteAwesome bench - would you make one to sell and ship?
ReplyDeleteGreat design have you thought about adding a leg curl part to the end? I did to mine and it works great!!!
ReplyDeleteHex Head Bolts, Hex Nuts, Flat Washers, Industrial washers, industrial fasteners, channel nuts, strut fittings, clamps, U bolts, pipe clamps, angle brackets, metal bracketry, industrial hex nuts, spring nut, DIN 933, DIN 125, DIN 9021, NFE 25513, purlin clip.
ReplyDeleteStainless Fasteners Online
Din 125 Washers India
Din 931 Bolts Supplier India
Din 933 Screw Supplier India
Channel Nut Manufacturer In India
Super cool and easy to follow, I just finished mine :) Thanks for the plans and instructions!!
ReplyDeleteI'm gonna get started on this project and try to make one of my own for my home gym :)
ReplyDeletethanks for the detailed guide :)
I might talk about this on my blog if you dont mind http://adjustableworkoutbench.com/blog
Great post!
ReplyDeleteThanks for sharing.
Adjustable dumbbells
Thank alot
ReplyDeleteLove this!
ReplyDeleteYou just woke alot of ideas here:)
Hi, I think your blog might be having browser compatibility issues.
ReplyDeleteWhen I look at your blog in Safari, it looks fine but when opening in Internet Explorer,
it has some overlapping. I just wanted to give you a quick heads up!
Other then that, excellent blog!
Hey wondering if anyone can help me with this build. In the materials list and further up in the comments he clarified that the 12 inch and 8 inch bolt are to me 10mm wide. From going to the store and researching online I have yet to find any bolt or screw that matches these measurements. Has anybody been able to find these and if not what did you use instead?
ReplyDeleteNo luck here either.
DeleteYou can use threaded rod then cut to desired length instead, just use nuts on both ends.
DeleteHey, Built this at the weekend. A few pieces of advice is make sure you have all the specified screws/bolts and follow the recommendations on wood. sizing. Found it easier to mount the main board onto the supporting limbs in isolation.
ReplyDeleteThanks, i did it stronger then your and it is perfect !
ReplyDelete